In the first part of this blog we discussed about how to deploy the application into Sales Force. Now in this blog we will see how to fetch the data from Sales Force and displaying it in the normal web applications or any desktop application. If we use Desktop(AIR) applications, even we can use offline capabilities also.
First we will see, what we will require to implement this solution apart from Flex Builder and Sales Force.
1. Sales Force account.
2. User Security Token
Note : We required this , if we try to access the account from outside a specific domain or IP address range.
3. Flex and AIR toolkits for Sales Force.
Note: Download the toolkit from here.
Getting Security Token From Sales Force.com
1. Login into Sales Force.com using your account credentials.
2. Go to account administration page by clicking on Setup button.
3. Go to Personal Setup section and expand Personal Information button. Then click on Reset My Security Token. It will open a page where we will have a button called Reset Security Token. It will send a mail to email account which we have given at the time of registration.

Copy the token from mail and keep aside. You can find the token from in mail. See the screenshot given below for reference.

Creating the Flex application for displaying the Sales Force data
1. Open the Flex Builder and create a new web application.
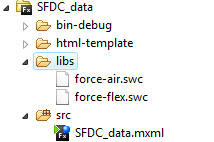
2. Unzip the toolkit folder downloaded from Sales Force and copy the files force-air.swc, force-flex.swc from bin folder. Paste these files into the libs folder of Flex project.

Note: You can directly give the path to libraries, using library path in Flex Application properties Window.
3. We require a connection object to connect to Sales Force account. This Object should be alive till the end of the application. We can create the connection object by using the following tag.
This tag is available in the namespace called xmlns:salesforce="http://www.salesforce.com/". Connection class is the main and key class with in this namespace. This is the entry point into the Sales Force Cloud.
4. Then we required to authenticate with Sales Force to get the data. For this we need pass the Credentials along with the security token we have copied from the mail.
import com.salesforce.objects.LoginRequest;
import com.salesforce.AsyncResponder;
var loginReq:LoginRequest = new LoginRequest();
loginReq.username = "sample@gmail.com";
loginReq.password = "password1TOKEN";
Provide the Credentials using LoginRequest object. There is no special property for token. Just we need concatenate the token with the password and sent it to server.
5. Add the Login Result Handler to handle the result given by the Login Function Call.
loginReq.callback = new AsyncResponder(fnLoginResult);
6. Add Even Handler method fnLoginResult method to the application. Add required logic to the event handler method.
force.query("SELECT Id, LastName FROM Contact",new AsyncResponder(updateGrids));
Just we are executing a query against Sales Force Contact Object. This is also one kind of event. So we required to add an event handler method to handle the query execution results. Here updateGrids is my result handler method.
7. Add the required logic to handle the query execution results.
private function updateGrids(result:QueryResult):void
{
grid.dataProvider = result.records;
}
8. Add a data grid to the UI and assign the results given by query to it.
9. Save the application and click run.

You will be able to see the data return by the Query in grids.
In my next post, we will see how to get the data from Sales Force.com Web Services.


